Introducing @storyblok/experiments - Zero-dependency A/B testing runtime for every tech stack

Storyblok is the first headless CMS that works for developers & marketers alike.
@storyblok/experiments provides framework-agnostic, server-first, dependency-free A/B testing utilities for Storyblok Experiments. It delivers a DX-focused all-in-one solution for the tedious parts of running A/B tests: variant assignment, slug resolution, and event tracking. The experiments package works with your existing framework, tech stack and analytics software.
New to A/B testing? Learn about Storyblok Experiments and read up on how to set up an experiment!
Running A/B tests with @storyblok/experiments
Our goal in this tutorial is to run a basic experiment to determine which of two cat pictures leads to more conversions. A “conversion” in this case is a click on a button that requests even more cat pictures.
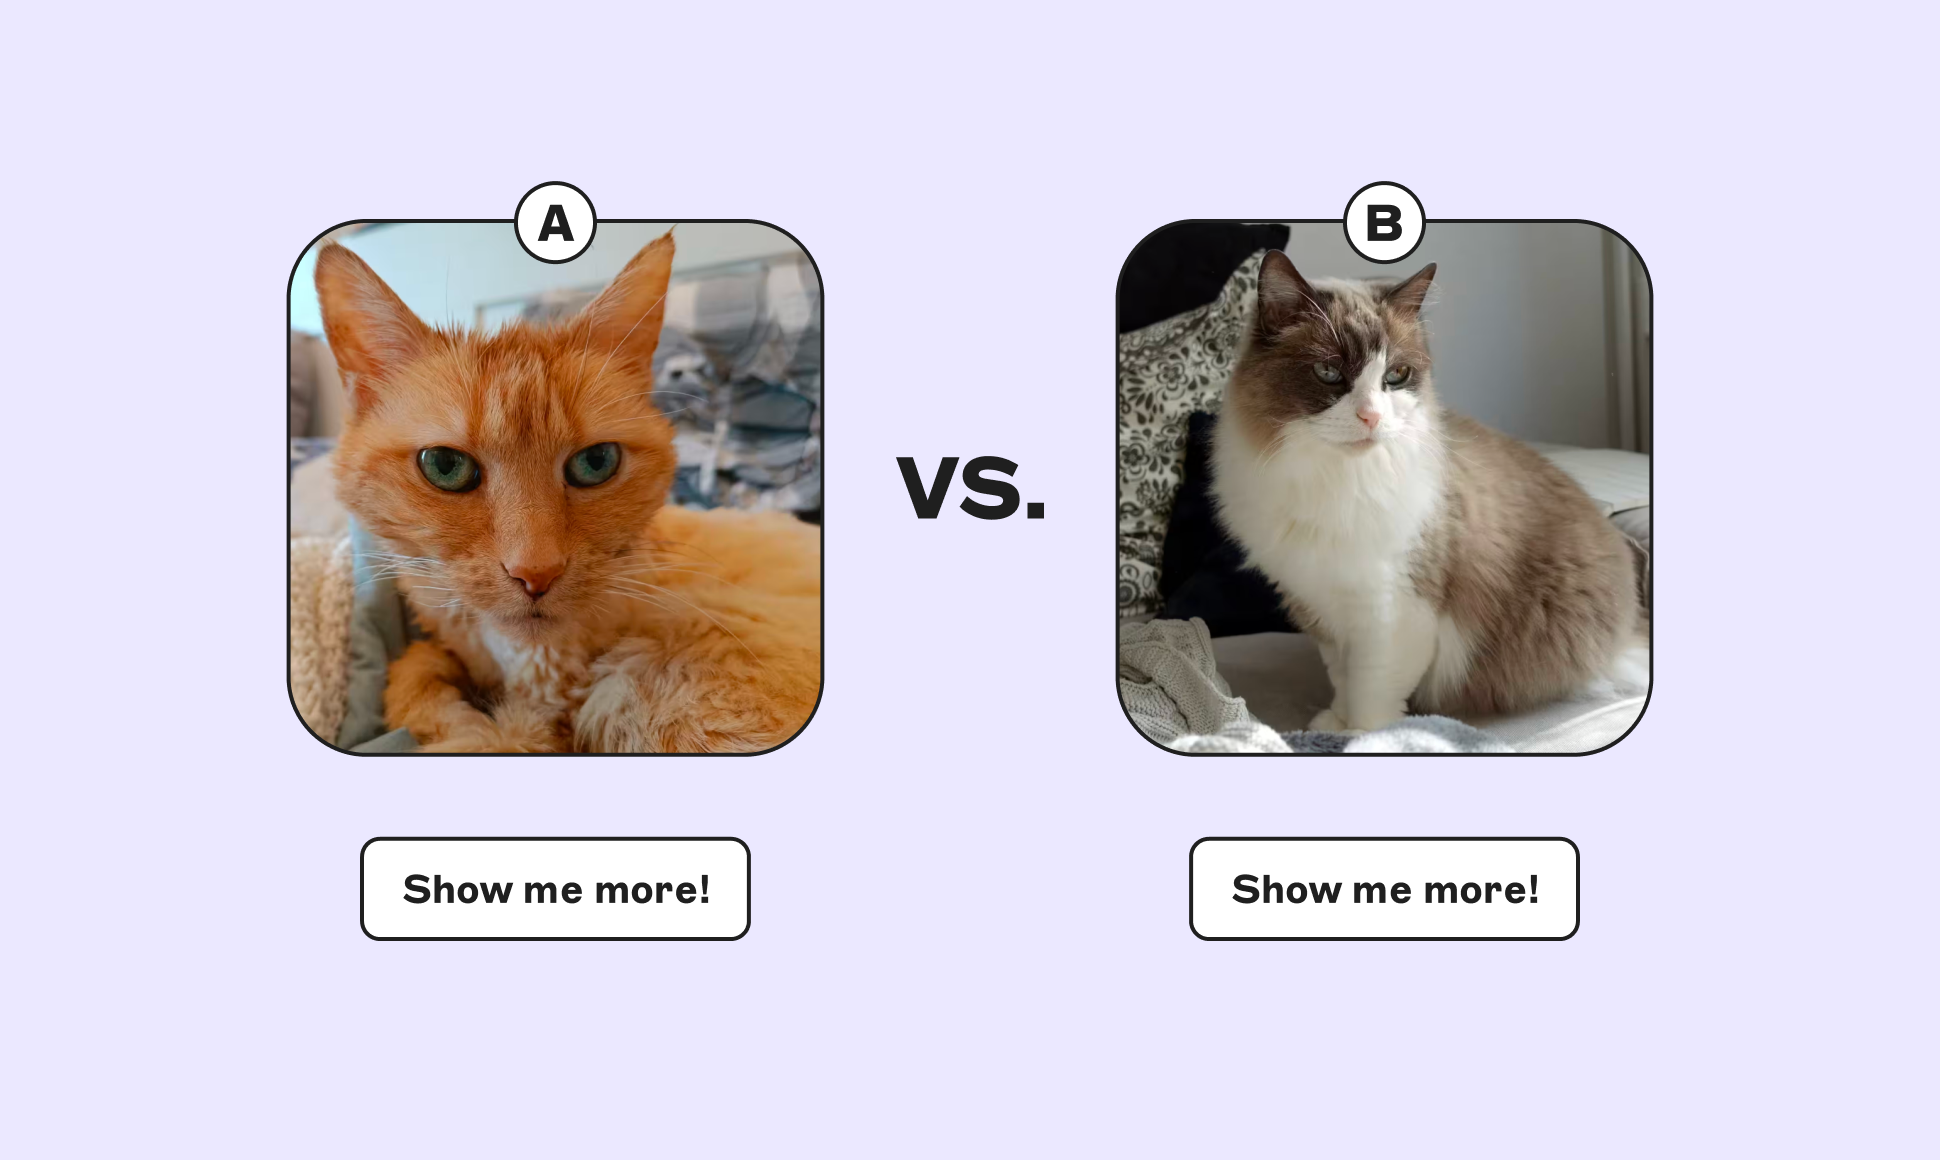
Ragdoll or red domestic cat: who commands more attention on the internet?
Setting up an experiment
To set up the experiment in Storyblok, first enable Experiments in the Labs section in your Space settings. Then navigate to the Story you want to run the experiment on and open the Experiment dialog in the right toolbar. Create a new Experiment with two variants and link the Story to it. Then, using the variants toggle in the top toolbar, switch to the alternative variant, update the Story with the differing details, and publish the results. See the manual on Experiments for more details.
For this tutorial, the experiment with name cat_picture_experiment consists of:
- A story with a single asset field called
picture - Two variants called Control and Test with a weight of 50% each, and a different cat picture for each variant
Accessing the experiments in your code is as easy as calling experiments.list() on an API client:
import { createApiClient } from "@storyblok/api-client";

const client = createApiClient({
  accessToken: process.env.STORYBLOK_ACCESS_TOKEN,
  region: "eu",
});

const { data } = await client.experiments.list();
console.log(data.experiments);
This returns JSON describing how the experiment's two variants map to Story IDs:
[
  {
    "id": 202902354287038,
    "name": "cat_picture_experiment",
    "display_name": "Cat picture experiment",
    "story_ids": [202623187673379],
    "variants": [
      {
        "name": "control",
        "display_name": "Control",
        "public_id": "var_vndz1lvhysk4",
        "weight": 50,
        "is_control": true,
        "story_mappings": []
      },
      {
        "name": "test",
        "display_name": "Test",
        "public_id": "var_nergpc63ukvp",
        "weight": 50,
        "is_control": false,
        "story_mappings": [
          {
            "original_story_id": 202623187673379,
            "original_slug": "home",
            "variant_story_id": 202902356417147,
            "variant_slug": "home-cat_picture_experiment-test"
          }
        ]
      }
    ]
  }
]
Unfortunately, fetching experiments data alone is not enough. To actually run an A/B test, we have to:
- pick a variant of the base story to show either cat picture A or B
- persist the chosen variant for the current visitor, so that any given visitor always sees the same cat picture
- track the experiment’s results, integrated with our analytics software
- render the chosen variant with our frontend technology of choice
This process not only requires us to integrate multiple different technologies, but also entails correctly selecting a random variant - with the weights taken into account. To make this as easy as possible, we can offload the hard parts to @storyblok/experiments and focus on what makes our projects unique.
Getting started with @storyblok/experiments
@storyblok/experiments works by deterministically turning a slug, an experiments payload, and a visitor ID into a selected variant. It also provides utilities to help track user exposure and conversion. Let's first explore a few low-level APIs to familiarize ourselves with the experiments package and the way A/B testing data flows through a Storyblok application.
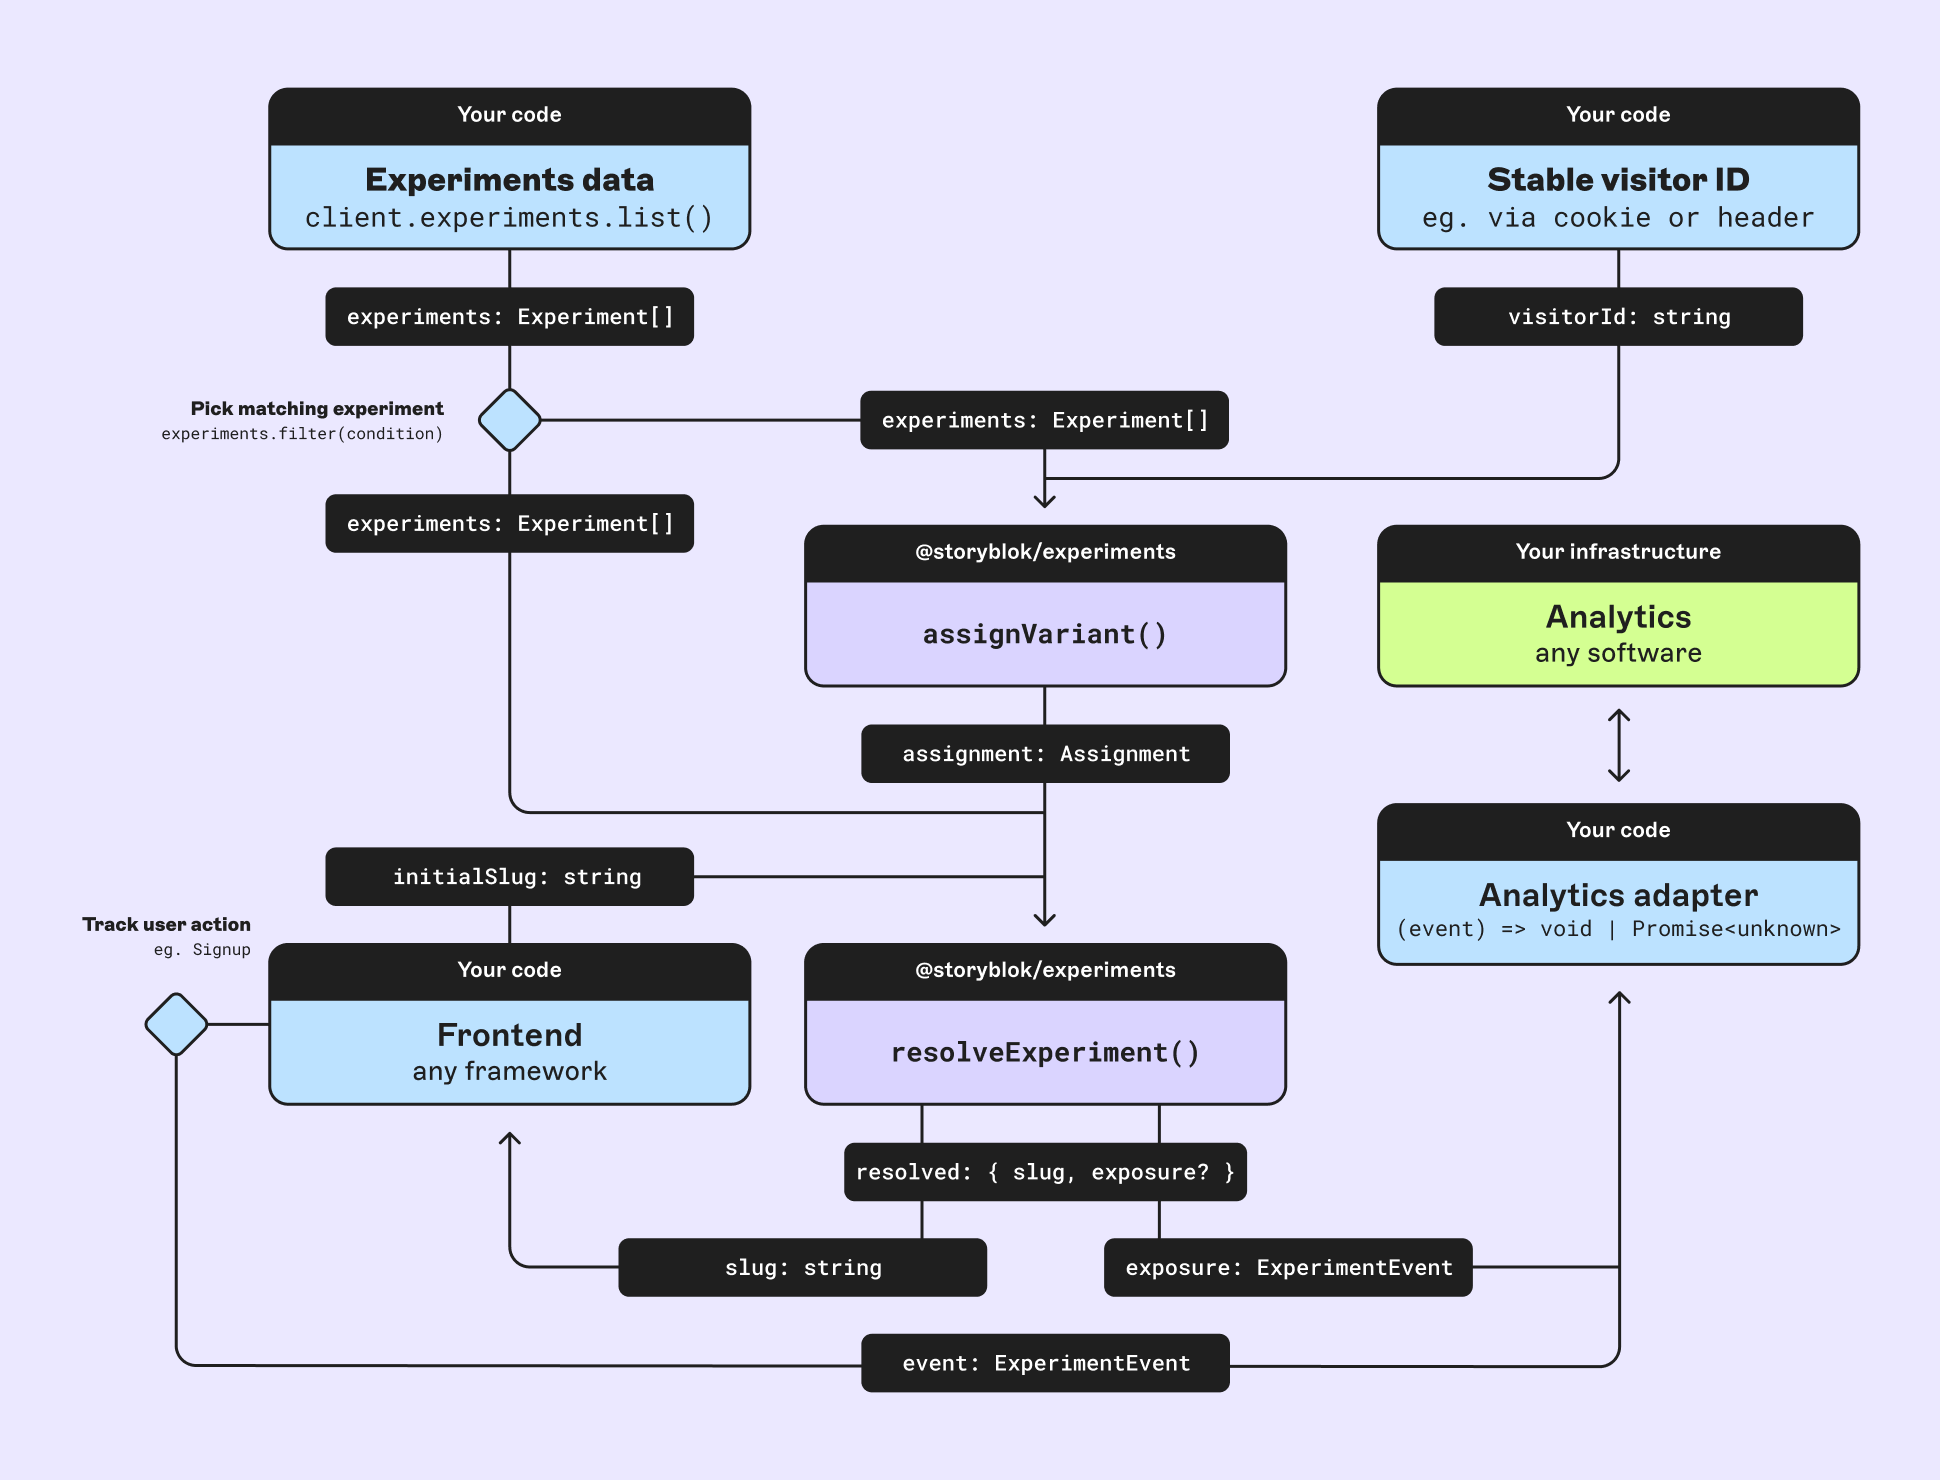
To get started, install the package like any other. Let's also make sure that we have @storyblok/api-client ready to request experiments data:
npm install @storyblok/experiments @storyblok/api-clientThe package relies on you providing a stable visitor ID and an analytics destination. The utilities in @storyblok/experiments translate these into the data you need to render content and track the results of the A/B test.
Let's start by identifying our users. This can be implemented in a variety of ways and could be as simple as a cookie:
const visitorId =
getCookie("visitor_id") ?? setCookie("visitor_id", crypto.randomUUID());The getCookie() and setCookie() functions in the above snippet are pseudocode. It's up to you to identify your users, be that via a cookie, HTTP header, or other means.
Next, we fetch the currently running experiments and pick the one that we are interested in:
import { createApiClient } from "@storyblok/api-client";

const client = createApiClient({
  accessToken: process.env.STORYBLOK_ACCESS_TOKEN,
  region: "eu",
});

const { data } = await client.experiments.list();

const experiment = data.experiments.find(
  ({ name }) => name === "cat_picture_experiment",
);Use the findExperimentBySlug() helper function to filter for experiments that apply to a particular slug.
Now we can import the assignVariant() function from the experiments package and pass it the visitor ID plus our chosen experiment. The function deterministically selects a variant, based purely on the variant's weights and the visitor ID.
import { assignVariant } from "@storyblok/experiments";

const assignment = assignVariant({ experiment, visitorId });
// identical result for every call with the same experiment and visitorId
Because this function delivers the same result for repeated calls with the same input, you do not need to keep track of which visitor is assigned to which variant. This makes running experiments a breeze, especially with multiple ongoing experiments.
Finally, it is time to expose our visitor to the chosen variant. The resolveExperiment() function turns the experiment data, the assignment, and a slug into the data that we need to load and display content:
import { resolveExperiment } from "@storyblok/experiments";

const { slug, exposure } = resolveExperiment({
  experiments: data.experiments,
  slug: "home",
  assignment,
});
// slug = story to request for rendering
// exposure = analytics info about the experiment exposureIf you pass a slug that's not part of an experiment to resolveExperiment() , it is returned unchanged and exposure is undefined.
The slug variable contains the full slug of the story and variant to render, ready to hand off to your usual render logic. Meanwhile, exposure is an experiment event object with the analytics information or undefined if the content in question is not part of an ongoing experiment. Experiment event objects implement the following interface:
interface ExperimentEvent {
  type: "exposure" | "conversion";
  experiment: EventExperiment;
  variant: EventVariant;
  visitorId: string;
  name?: string; // Conversion goal name (e.g. "signup")
  props?: Record<string, unknown>; // Arbitrary data to be forwarded
}
The event objects contain all the information that common analytics software needs to aggregate and eventually push to Storyblok via the relevant management API endpoint. But before this can happen, we need to connect our code to an analytics endpoint.
Integration with your analytics software
A/B tests can track many different user behaviors, with the most important being:
- Exposure: a user is exposed to a specific variant in an ongoing experiment
- Conversion: a users performs an action (eg. signup) while exposed to a specific variant
Since different analytics tools come with different APIs, it is necessary to define a unified interface for tracking the above events. For this purpose, @storyblok/experiments defines the concept of adapters.
An adapter is a function of type (event) => void | Promise<unknown> that sends the analytics data contained in the event object to your analytics destination. If your destination is an HTTP endpoint, use the createFetchAdapter() factory function provided by the experiments package to generate an adapter that POSTs JSON-encoded event data. For other use cases, you can easily write your own:
import { createFetchAdapter } from "@storyblok/experiments/adapters";
const adapter = createFetchAdapter("https://my.analytics.example/events");
// Adapter for POSTing JSON to an HTTP endpoint

const customAdapter = (event) => myAnalytics.track(event);
// Custom adapter for the API provided by "myAnalytics"

// Invoking the fetch adapter, calling fetch() under the hood
adapter({
  type: "exposure",
  visitorId,
  experiment: { id: 202902354287038, name: "cat_picture_experiment" },
  variant: { name: "test", public_id: "var_nergpc63ukvp" },
});

// Invoking the DIY adapter, calling myAnalytics.track() under the hood
customAdapter({
  type: "exposure",
  visitorId,
  experiment: { id: 202902354287038, name: "cat_picture_experiment" },
  variant: { name: "test", public_id: "var_nergpc63ukvp" },
});
It is important to ensure that the adapters are invoked when users are exposed to a variant or perform an action that counts as a conversion. To make this as easy and fail-safe as possible, the experiments package provides one additional feature to automatically connect experiments, adapters, variant assignment, and experiment resolution.
Factory function createExperiments()
createExperiments() is a factory function for objects that wrap assignVariant() and resolveExperiment(). It pre-configures arrays of experiments and adapters into an API that is very easy to use:
import { createExperiments } from "@storyblok/experiments";
import { createFetchAdapter } from "@storyblok/experiments/adapters";

const experiments = (await client.experiments.list()).data.experiments;

const exp = createExperiments({
  experiments,
  adapters: [createFetchAdapter("https://my.analytics.example/events")],
});

// Automatically dispatches "exposure" event on resolve for the matching
// experiment. No more need to manually handle assignment objects!
const {
	slug,      // resulting slug
	variant,   // assigned variant
	exposure,  // exposure event
	delivered, // promise that resolves on event delivery
} = exp.resolveExperiment({ slug: "home", visitorId });


// Later, on user action
// Automatically dispatches events to the adapter(s)
exp.track("signup", visitorId, { plan: "pro" });
This API saves you from several manual steps and prevents some easy mistakes:
exp.resolveExperiment()automatically selects relevant experiments for a given slug, with no manual filtering of the experiments list requiredcreateExperiments()assumes that experiment resolution implies exposure and calls the adapter(s) with the"exposure"event every time you invokeexp.resolveExperiment()- there is no way to not track exposuresexp.track()serves as single point of contact for a potentially long list of adapters
In serverless environments, use your platform’s waitUntil() feature with the delivered promise to ensure the process is not terminated prematurely.
The fundamental data flow looks as follows:
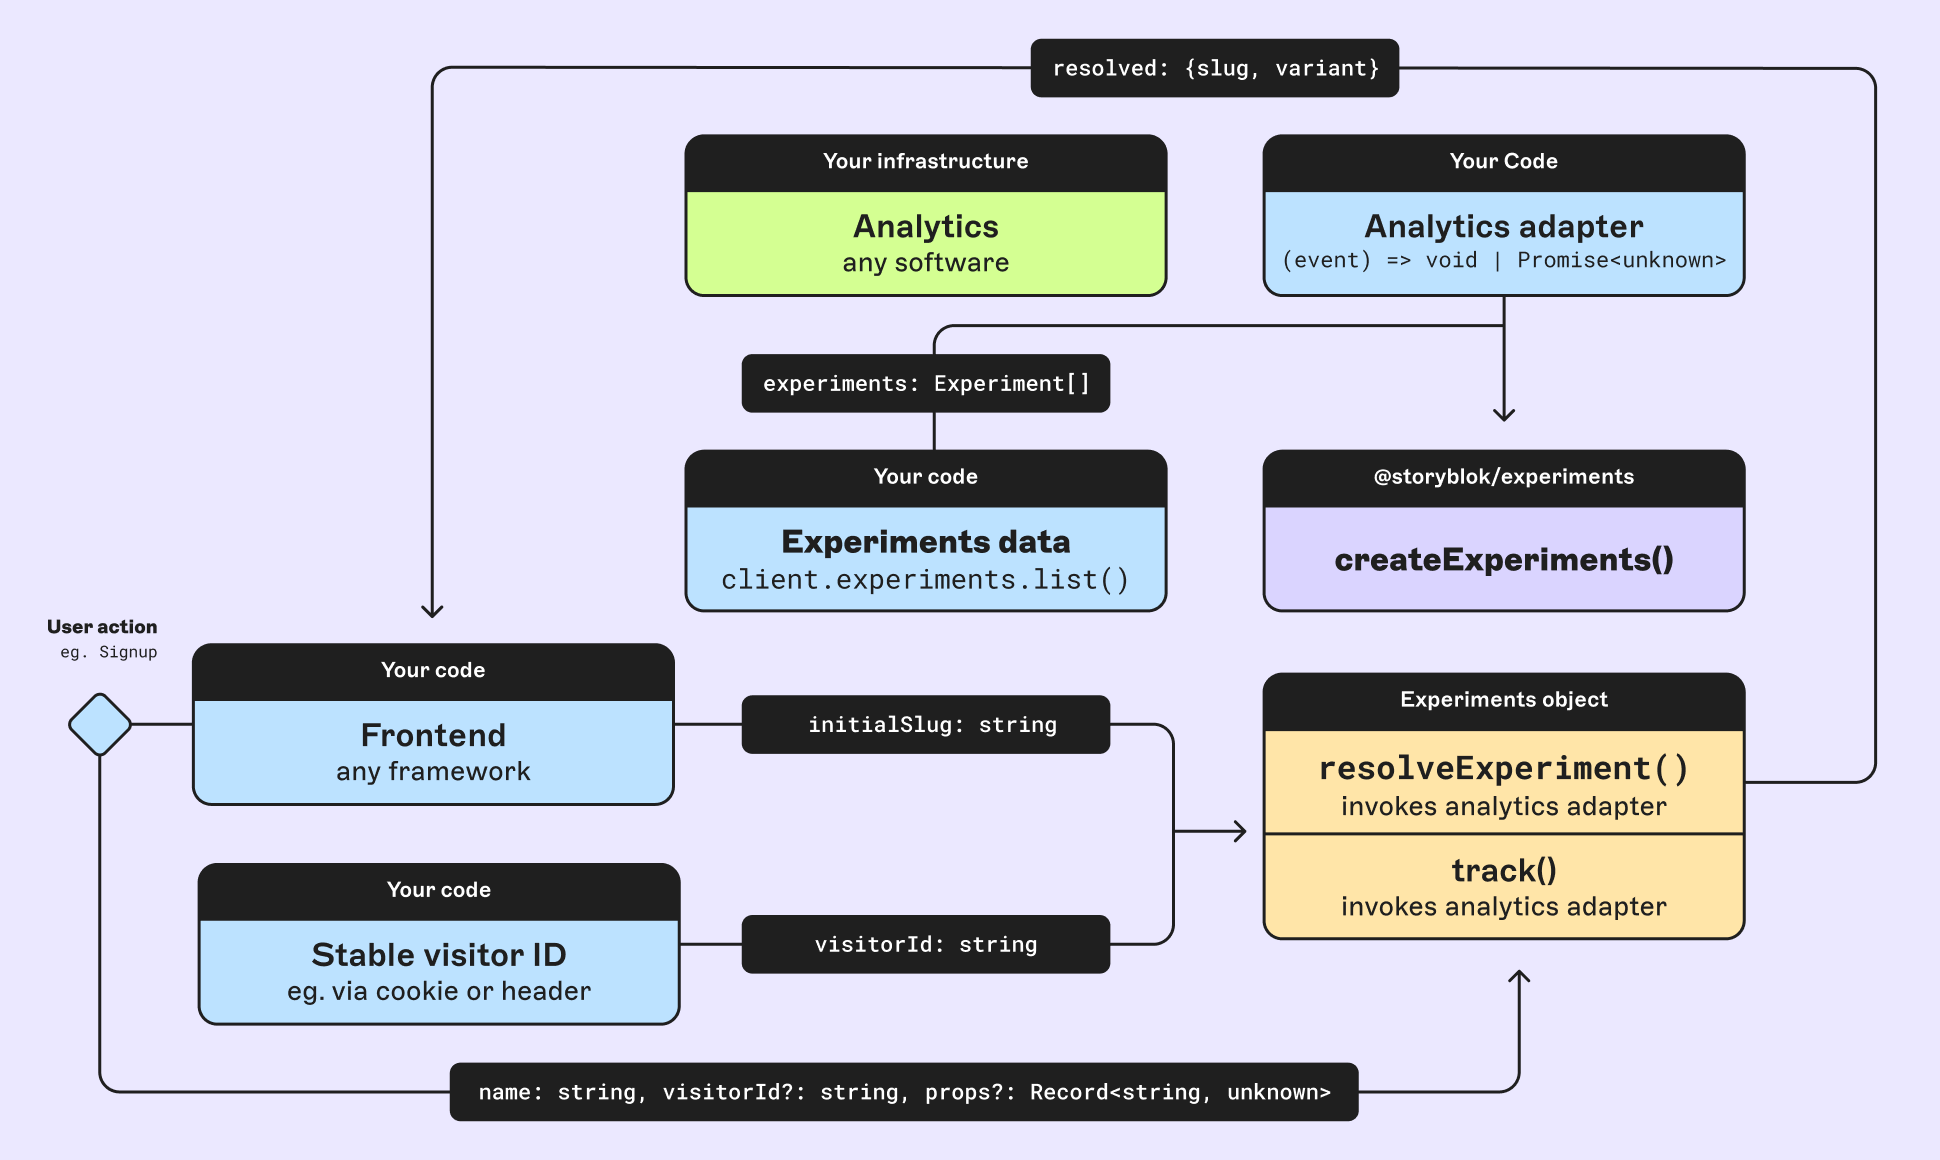
createExperiments() is designed for server-side, per-request use. Let's see how it integrates into a Storyblok application and actually run our cat-based A/B test.
Integration with a Nuxt application
Once you've picked a way to track users and wrapped your analytics endpoint in an adapter, the variant selection functionality needs to be sandwiched between your application's routing and rendering logic. How this looks in practice depends on your particular tech stack - while @storyblok/experiments itself is framework-agnostic, the code required for integration into frameworks is not. But since the broad strokes will to be similar for most integrations, it's worth taking a look at one particular example to see how everything fits together.
Integrating experiments into a Nuxt application (running our A/B cat picture test) consists of four steps:
- Handle visitor tracking via cookie in server middleware
- Centralize experiment utilities for use in server middleware and server routes
- Route API requests through a server route that make use of the experiment utilities
- Use a second server route to track conversions
The cookie middleware not only sets a cookie (unless already set), but also attaches it to the incoming request headers. This is required to ensure that internal requests during SSR see the same visitor ID as subsequent requests.
export default defineEventHandler((event) => {
  let visitorId = getCookie(event, "sb_vid");
  if (!visitorId) {
    visitorId = crypto.randomUUID();
    setCookie(event, "sb_vid", visitorId, {
      httpOnly: true,
      sameSite: "lax",
      maxAge: 60 * 60 * 24 * 365,
    });
    // Attach the cookie to the incoming request's headers
    const incoming = event.node.req.headers.cookie;
    event.node.req.headers.cookie = incoming
      ? `${incoming}; sb_vid=${visitorId}`
      : `sb_vid=${visitorId}`;
  }
  event.context.visitorId = visitorId;
});
The actual experiment setup happens in a utility file. Let's start with fetching new experiment data in reasonable intervals:
import { createApiClient } from "@storyblok/api-client";

export const client = createApiClient({
  accessToken: process.env.STORYBLOK_ACCESS_TOKEN,
  region: "eu",
});

// Use a cached function to fetch experiments only occasionally, since they
// presumably don't change between every request
const getExperiments = defineCachedFunction(
  async () => {
    const { data } = await client.experiments.list();
    return data.experiments ?? [];
  },
  { maxAge: 60, name: "sb-experiments", getKey: () => "all" },
);In Nuxt, exporting variables like client from server utilities automatically makes them available in other server files.
With a safe way to load experiments in place, we can now build the useExperiments() server utility and a helper function to track conversions.
import { createExperiments } from "@storyblok/experiments";
import { createFetchAdapter } from "@storyblok/experiments/adapters";

// Attaches the configured experiments object to events
export async function useExperiments(event) {
  if (event.context.experiments) {
    return event.context.experiments;
  }
  return (event.context.experiments = createExperiments({
    experiments: await getExperiments(),
    adapters: [createFetchAdapter("https://your-analytics-sink.example/events")],
    onError: (error, event) =>
      console.error("[experiments] adapter failed", error, event),
  }));
}

// Used to track conversions
export async function trackGoal(event, goal) {
  const visitorId = getCookie(event, "sb_vid");
  const experiments = await useExperiments(event);
  experiments.track(goal, visitorId, { source: "cta" });
}
The implementation of trackGoal() illustrates how our approach works. By sending every relevant operation through useExperiments() , we ensure that a common experiments configuration is in use at all times.
The onError callback in createExperiments() gracefully reports problems with the analytics endpoint without interrupting the tracked event itself.
To put the experiment utilities and our cookie to use, we next build a server route through which we pass all requests to the Storyblok API - after resolving relevant experiments and assigning a variant:
export default defineEventHandler(async (event) => {
  const { slug = "home" } = getQuery(event);
  const experiments = await useExperiments(event);

  // Resolve the experiment using the API provided by useExperiments()
  const { slug: resolvedSlug, variant } = experiments.resolveExperiment({
    slug,
    visitorId: getCookie(event, "sb_vid"),
  });

  // use "resolvedSlug" to query the Storyblok API
  const { data } = await client.get("/v2/cdn/stories/{slug}", {
    path: { slug: resolvedSlug },
    query: { version: "published" },
  });

  if (!data?.story) {
    throw createError({
      statusCode: 404,
      statusMessage: `Story not found: ${resolvedSlug}`,
    });
  }

  return { story: data.story, variant: variant?.name ?? null };
});
This server route is now ready to be used in components:
<script setup>
// Story slug from route
const path = useRoute().params.path || [];
const slug = computed(() => path.join("/") || "home");

// Fetch data from the /api/page server route that injects everything related
// to the experiments package
const { data } = await useAsyncData(
  () => `page:${slug.value}`,
  () =>
    $fetch("/api/page", {
      query: { slug: slug.value },
      // Required to ensure that the $fetch request inherits the sb_vid cookie
      headers: useRequestHeaders(["cookie"]),
    }),
);
</script>

<template>
  <StoryblokComponent v-if="data?.story" :blok="data.story.content" />
</template>
The second server route serves to track conversions and showcases the idempotency of the experiment package's utilities:
export default defineEventHandler(async (event) => {
  const { slug, goal } = await readBody(event);
  const experiments = await useExperiments(event);
  // Assigns the same variant as in the request handler
  // since slug and visitorId are the same
  experiments.resolveExperiment({
    slug,
    visitorId: event.context.visitorId,
  });
  await trackGoal(event, goal);
  return { ok: true };
});
As the last step, we want to actually show our cat pictures to our users and track which variant has a better conversion rate. This only requires a basic component to display the image and button that calls the tracking server route:
<script setup>
defineProps({ blok: Object });

async function showMore() {
  const path = useRoute().params.path || [];
  await $fetch("/api/convert", {
    method: "POST",
    body: {
      slug: path.join("/") || "home",
      goal: "conversion",
    },
  });
  await navigateTo({ path: "/more" });
}
</script>

<template>
  <p v-editable="blok">
    <img :src="blok.picture.filename" :alt="blok.picture.alt" />
    <br />
    <button @click="showMore">Show me more!</button>
  </p>
</template>
Combined with some CSS this now smoothly runs the experiments with deterministically bucketed users and reporting via our analytics software of choice.
Conclusion
In this tutorial, we have seen how @storyblok/experiments works, how you should think about it, and what one possible integration may look like. The implementation details are going to vary depending on your particular tech stack, but the fundamentals stay the same:
- The experiments package helps you pick a variant and resolve it to a slug to render
- No storage or other dependency required; a stable visitor ID is the only requirement
- It integrates with whatever analytics software and frontend tech stack you use
With the tedious parts taken care of, you can focus on what makes your project unique: fetching data, rendering content, and tracking conversions.