From prompt to CMS-powered landing page with Lovable and Storyblok
Storyblok is the first headless CMS that works for developers & marketers alike.
Ask Lovable for a landing page, and you get one in a couple of minutes. The spacing is right, the gradient is tasteful, and every word of copy sits in a TypeScript .tsx file. When the headline needs to change, you have two options: prompt Lovable again or find a developer.
Flip that order around: send the brief to the CMS first. Let the agent design the content model in Storyblok and write the content, then let Lovable build the UI on top of what already exists. The copy never lands in code. An editor changes a headline in Storyblok, the live page shows the new headline on the next request, and nobody prompts Lovable for it.
Two connections make that work. Storyblok’s Model Context Protocol (MCP) server lets the agent build the content model and write the content while you work in the chat. Lovable’s Storyblok connector set to read-only, lets the finished app fetch published content at runtime. Write access stays in the chat, and the live app can only read.
What you need
- A new Storyblok space with the default configuration.
- An empty Lovable project.
- A Lovable role that can create connections.
- A public access token for the space. Lovable’s connector uses it to read published content.
Personal access token
The MCP server uses a personal access token (PAT) to call the Management API. To create one:
- In Storyblok, open My account → Account settings → Personal access tokens.
- Select Generate new token, and give the token a name and an expiration date.
- Restrict the token to the one space you’re working in.
- Select the scopes the agent needs:
- Components read and write
- Stories read, write, and publish
- Spaces read
- Assets read and write
- Leave Full user permission off. You’re about to paste this token into another product.
- Generate the token and copy it. Storyblok shows it only once.
Public access token
Lovable’s connector uses a public access token to read published content. To create one:
- In the space, open Settings → Access Tokens.
- Select New Access Token.
- Keep the access level Public, name the token, and Save.
A public token only returns published stories, which is what a production site needs. A preview token also returns drafts and belongs to a staging or preview environment.
The division of labor
Before you start, take a moment to understand which tool does what:
Storyblok’s MCP server | Lovable’s Storyblok connector | |
|---|---|---|
Lovable calls it | Custom MCP server (chat connector) | App + chat connector |
API | Management | Content Delivery |
Access | read, write, publish | read-only (Content Delivery API option) |
Available to | the chat while you build | the chat and your published app |
Job here | build the content model and write the content | render the page |
Lovable’s connector can also write to Storyblok if you connect it with the Management API option, so why add the MCP server? Because of what your published app is allowed to do. The connector serves the chat and your deployed app through one shared credential, and the deployed app never asks for approval. If that credential can write, so can the live site. Connect the connector with the Content Delivery API option and a public token instead, so that the published app can only read published content. All writing stays in the chat, through the MCP server, where Lovable asks before each change.
You don’t have to build the content model from Lovable, either. If you create the blocks yourself, skip to step 3 and ask Lovable to use them.
The MCP server does the building, and the connector does the reading.
1: Connect the Storyblok MCP server
Storyblok hosts the MCP server, so there’s nothing to install. In Lovable, open Connectors, select Create connector or MCP server → MCP server, and provide the details:
- Server name:
Storyblok - Server URL:
https://mcp.storyblok.com/mcp - Authentication: Bearer token or API key, then paste the personal access token from Personal access token.
Select Add server. Lovable doesn’t offer OAuth for Storyblok’s MCP server yet, so the token is how the server knows which space it can work in and what it can do there.
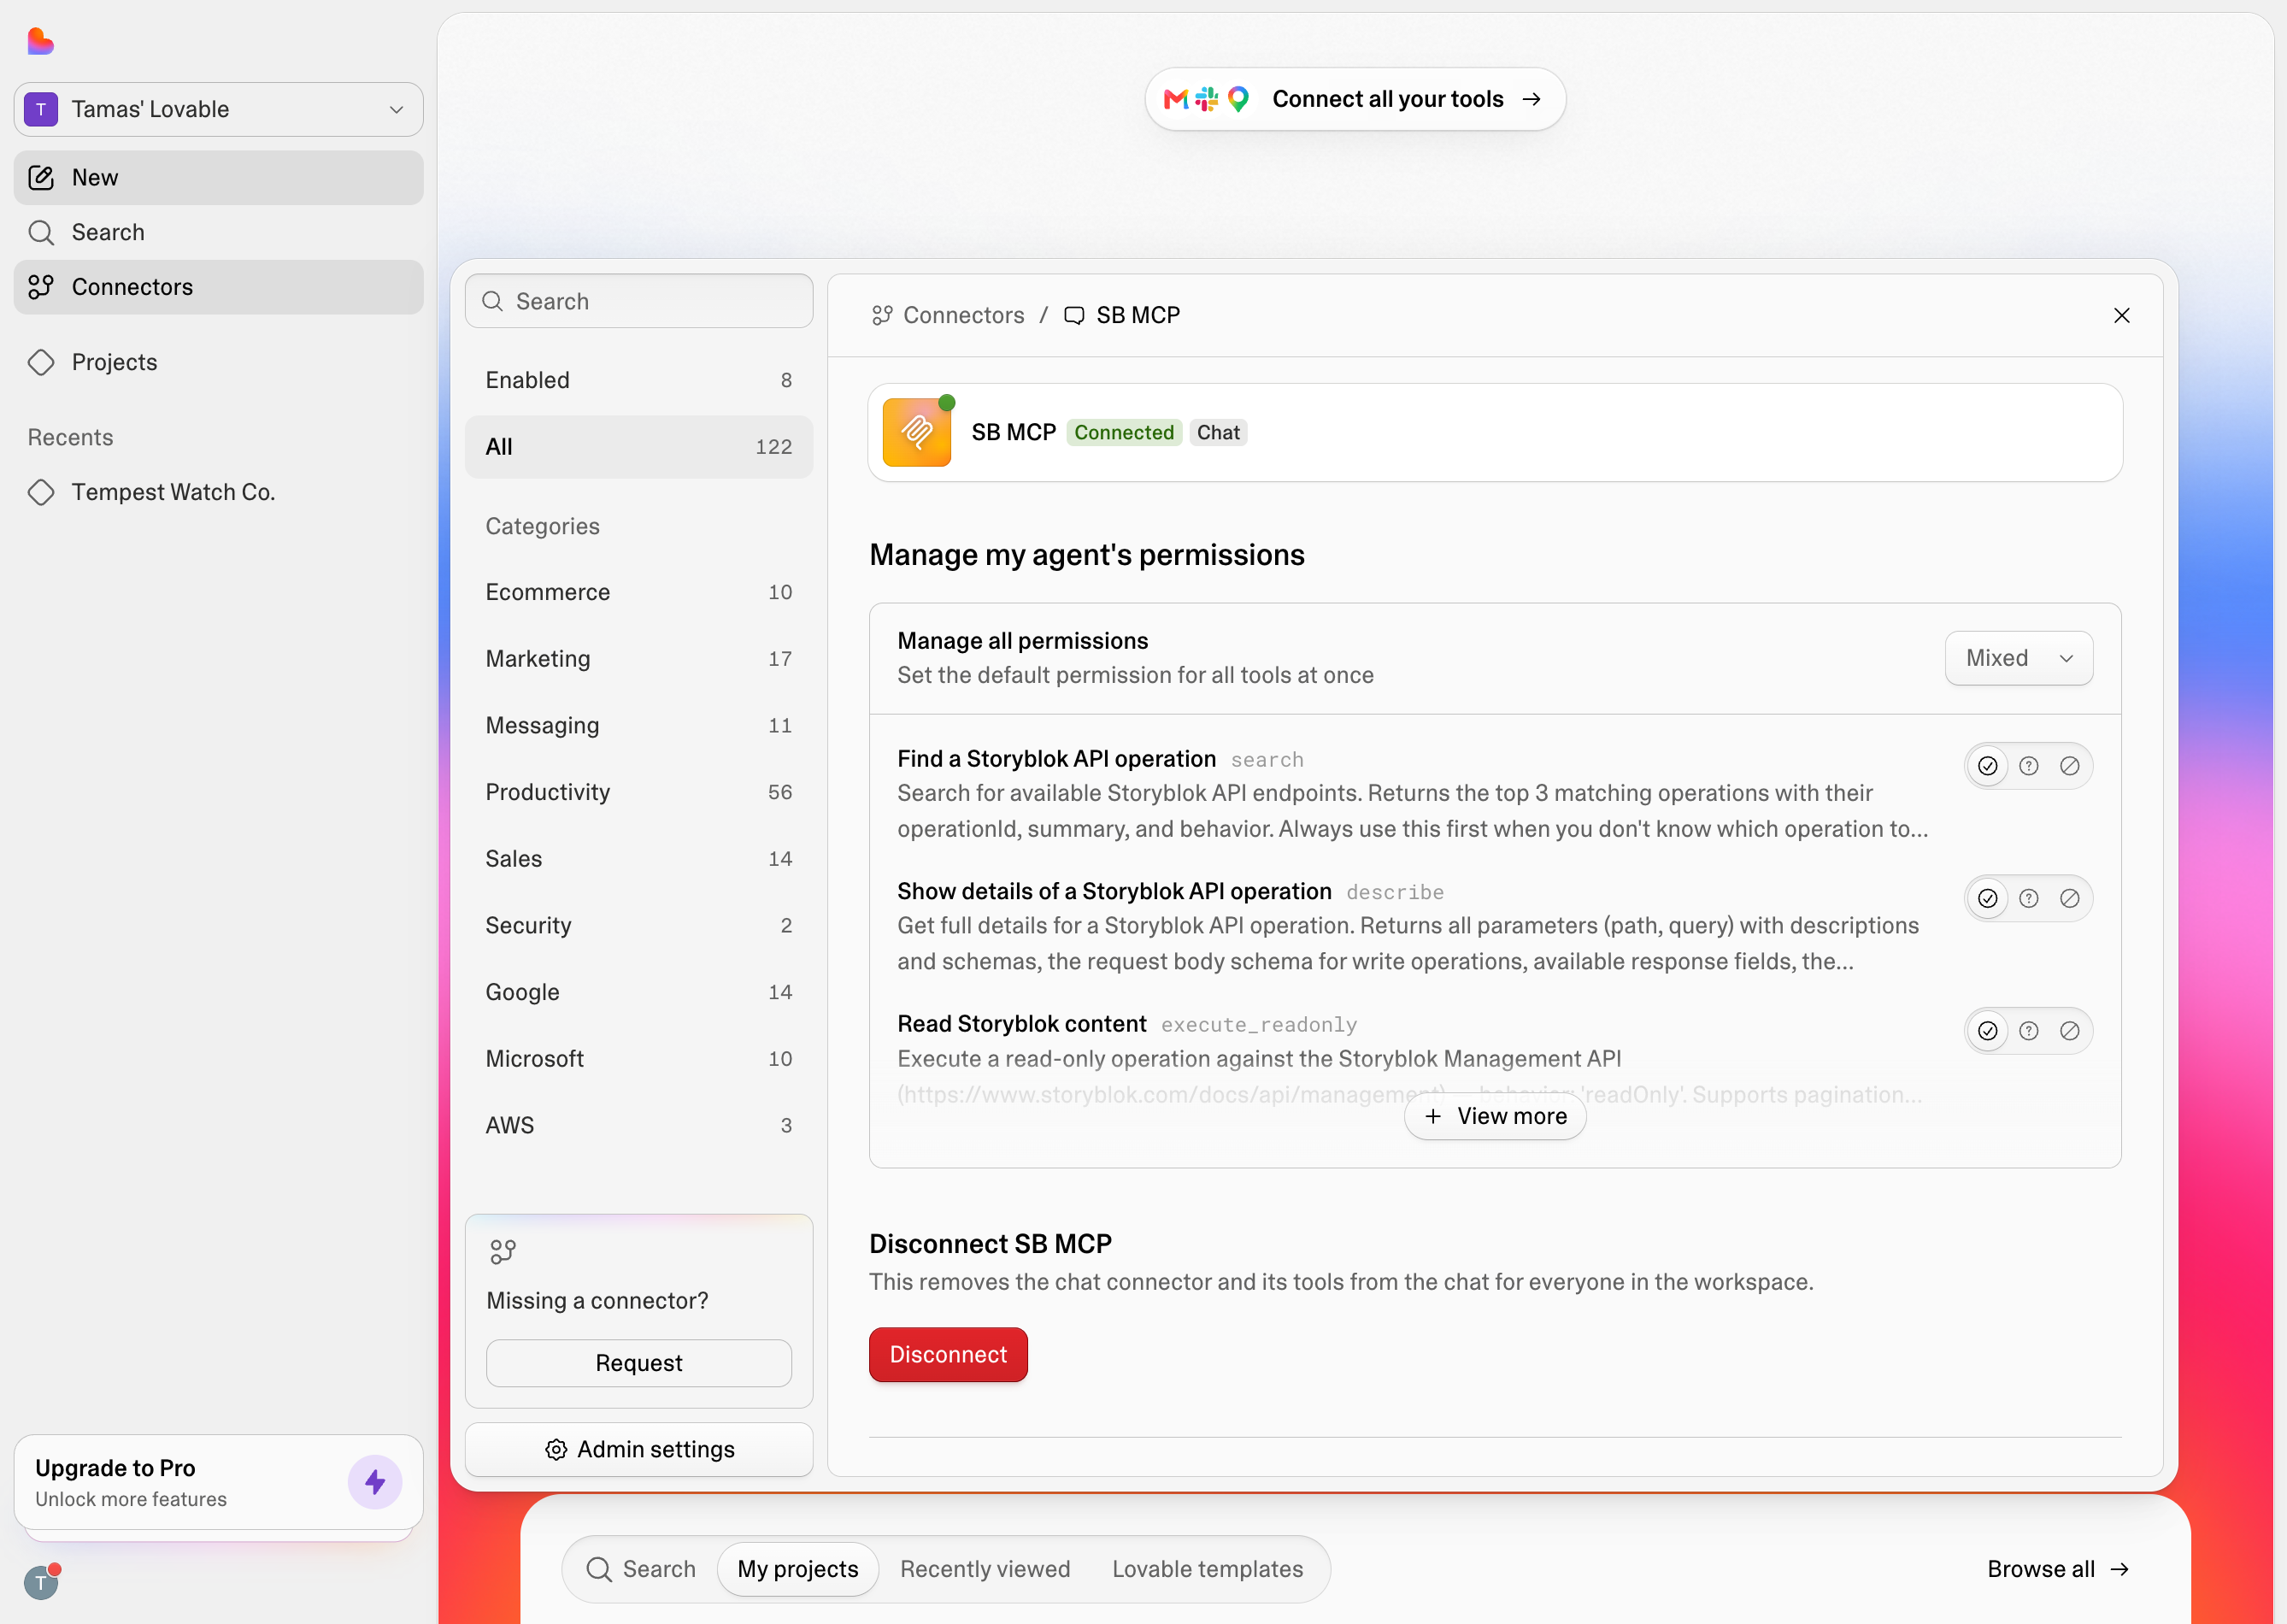
Lovable’s permissions page for the Storyblok MCP server. The write tools ask before every call.
Lovable now has access to the following Storyblok tools: search, describe, execute_readonly, execute_mutating, execute_destructive, upload_asset, and upload_asset_finish.
2: Send the brief to Storyblok
Every new space comes with a page content type, three default blocks (teaser, grid, and feature), and an unpublished Home story with the slug home. The prompts in this step use page and Home.
You send two messages in the Lovable chat:
- The brief and a prompt for the content model.
- After you’ve confirmed the content model, create the content.
If you send the brief without a prompt, you’ve handed an app builder a spec with no constraints attached. Expect a landing page you didn’t ask for.
Lovable’s agent reads each message and calls Storyblok’s Management API through the MCP server.
Write the brief as you would for a person. The example below is for a conventional page layout:
Product brief

Halvard Watch Co. is launching the Tempest 39, a hand-wound mechanical
chronograph. 39mm steel case, sapphire crystal, tachymeter bezel, 30-minute
and 12-hour totalizers. Run of 300 pieces.

We need a product page with:
- A hero with a headline, one line of supporting copy, a product photo, and
  a "Reserve yours" call to action.
- Three details: the movement, the case and crystal, and the dial layout.
  Each needs a short title and a sentence.
- A closing section with a couple of formatted paragraphs about the limited
  run, and a link to join the launch list.

Audience is enthusiasts who read spec sheets before they read copy. Plain
language, no hype.
The content model
Below the brief, in the same message, add this prompt:
Using the Storyblok MCP server, design the content model for the brief
above in my Storyblok space. Don't write any application code, and don't
create any stories or content yet.

- Update the existing `page` content type so it has a `body` field of type
  Blocks.
- Create nestable blocks for the hero, the spec grid, an individual spec,
  and the closing section.
- Use Text for single-line copy, Richtext only where the brief asks for
  formatted paragraphs, and Asset for images.
- On `page.body`, set restrict_components with a component_whitelist
  containing only the blocks you create.

List the blocks and fields you plan to create, and wait for my confirmation
before calling any mutating tool.
Before it does anything, the agent asks which space to use and which region the space is in. The region is the server location you chose when you created the space. The token already limits the agent to one space, but the Management API has a different address for each region, so answer both.
The agent then proposes a content model and waits for your approval. When writing this article, the agent proposed the following:
- Four nestable blocks:
hero,spec_grid,spec, andclosing - A
bodyfield on the existingpagethat can containhero,spec_grid, andclosing - A
specsfield insidespec_gridthat accepts onlyspec.
It also made a choice the prompt hadn’t asked for: it added a multilink, Storyblok’s link field type, to the hero’s call to action and the closing link. That’s the right field type for something that might point to a story or to an external URL, and it’s the kind of decision worth confirming before any content depends on it.
Confirm, and the writing begins. Each step pauses and displays the operation name, the space ID, and the action that requires your approval.
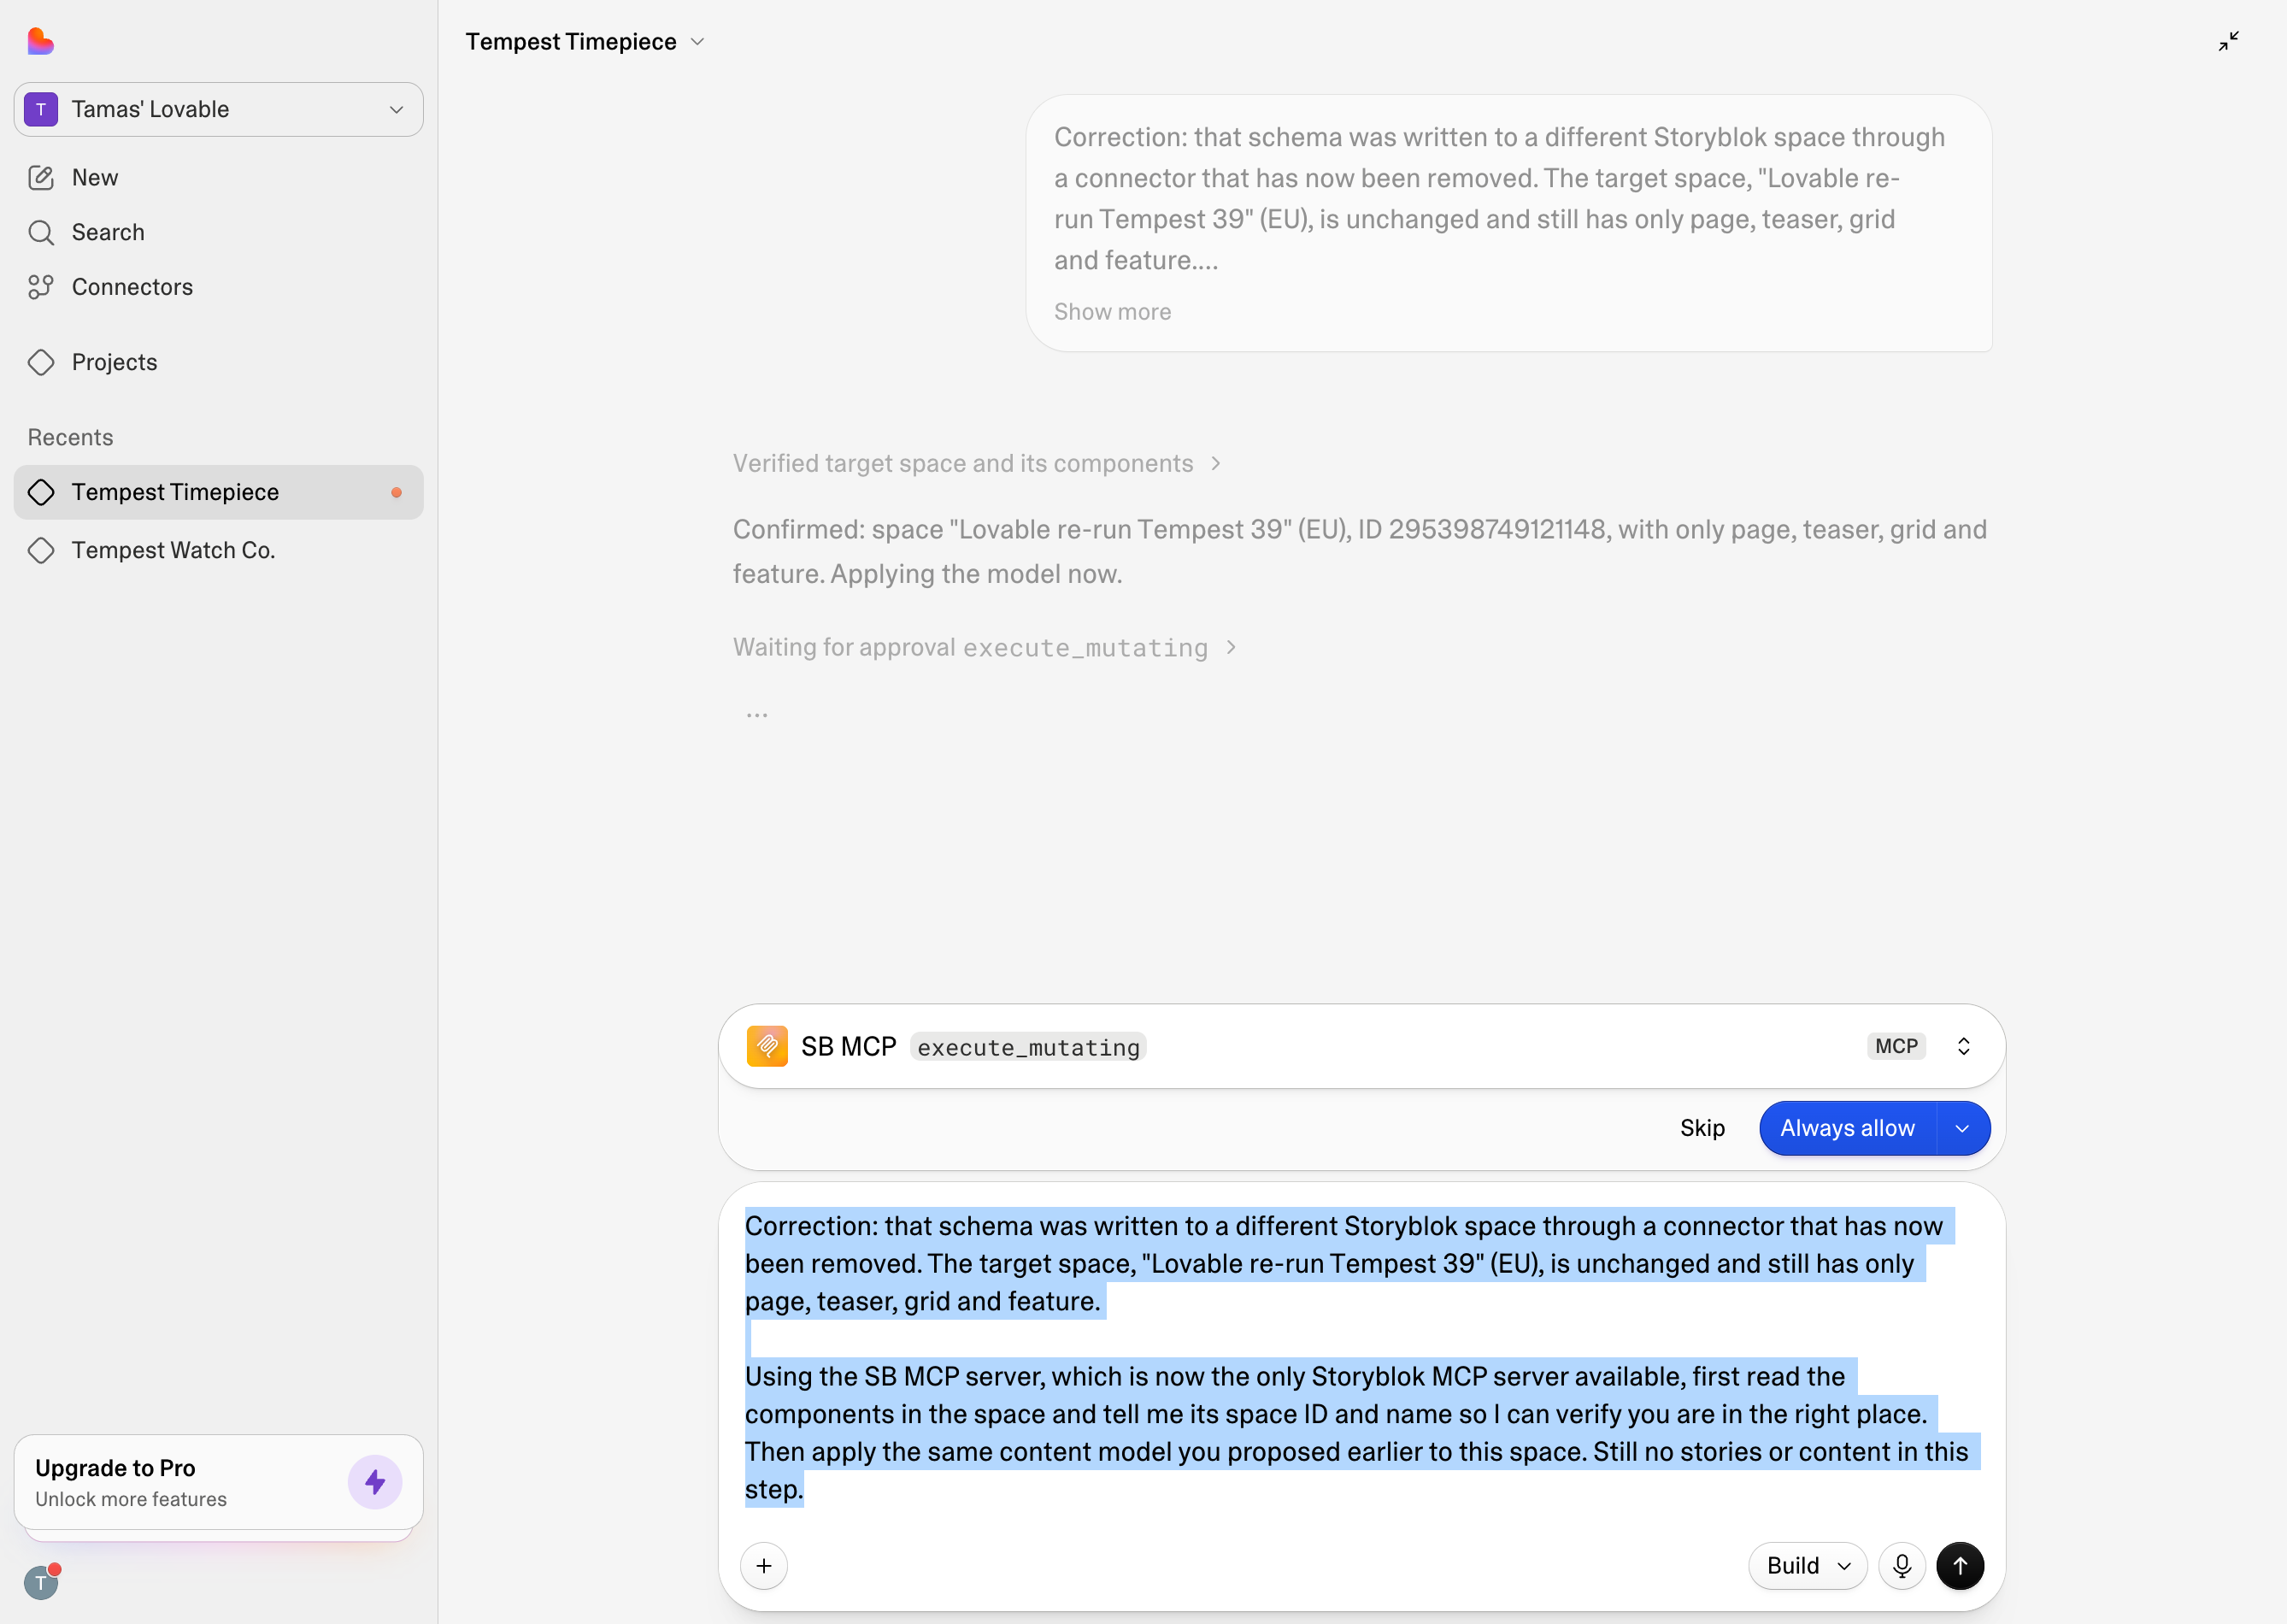
Lovable’s approval card for execute_mutating. The primary button is Always allow. Open the drop-down next to it and choose Allow once instead.
When the agent is done, check the content model in Storyblok rather than in the chat:
- The right space. The agent’s summary names a space. Open the Block library in this space and confirm the blocks are there.
- The whitelist.
specbelongs insidespec_gridonly. Ifpage.bodyaccepts it too, an editor can insert it into the page. Ensure Manage access to nestable blocks is checked on the Blocks field. - Leftover blocks. You can delete
teaser,grid, andfeature. The allowlist onpageensures an editor can’t accidentally insert them.
The content
Now, in a second message, ask for the content:
Using the Storyblok MCP server, fill the existing story called "Home"
(slug "home") with real copy written from the brief above: one hero, one
spec grid containing the three specs, and one closing section. Leave the
hero image empty rather than uploading a placeholder. Then publish it.

List the copy you plan to write, field by field, and wait for my
confirmation before calling any mutating tool.
The prompt fills the existing Home story instead of creating a new one, because a new story with the slug home would fail: the slug is already taken.
The agent follows the brief and then keeps going. Read the generated copy in the chat before you confirm.
When writing this article, the brief said “sapphire crystal,” and the copy said “a sapphire crystal front and back.” The brief listed two totalizers, and the copy added a running-seconds subdial. Each addition read like a spec sheet, which was the point of the brief’s last line, but none of it was true.
After the agent publishes the story, check it in Storyblok:
- The copy. Open the Home story and read it where your editors will. Fix anything the brief didn’t ask for.
- The structure. One hero, one spec grid with three specs, and one closing section.
- The hero image. The Asset field is empty. Upload the product photo. If the field remains empty, Lovable generates a product photo and bundles it into the repository as a fallback.
- Published. The public token returns published stories, so the connector can’t access a draft.
3: Add Lovable’s Storyblok connector
In Lovable, open Connectors, select Storyblok, and then Add connection → App + chat connector. Provide the following details:
- Display name: any name you recognize, for example,
Halvard. - Space region: the region you gave the agent in step 2. You’ll find it in the space’s Settings → General.
- Public or preview access token: the public token from Public access token.
Select Connect.
4: Ask Lovable to build the page
The content model already exists, and Lovable can use your blocks and fields to build the site.
Send the following prompt:
Read the blocks in my Storyblok space and the "home" story. Build a landing
page for it: one React component per Storyblok block, each taking a `blok`
prop, mapped by the blok's `component` field in a single mapping object.

Fetch the story through the Storyblok connector. Render rich text fields
with @storyblok/richtext. Restrained design, plenty of space, the product
photo leading. No hardcoded copy, every string comes from the story.
The connection isn’t attached to your project yet, so Lovable first asks which connection to link. Choose the one you created in step 3.
Two things to note before you continue:
- The prompt names
@storyblok/richtextbecause Storyblok stores rich text as JSON rather than HTML, and the closing section’s paragraphs need a renderer. Instead of letting Lovable create a one-time renderer, ask it to use Storyblok’s dedicated tooling. - If Lovable offers to install Storyblok’s React SDK and fetch with an access token, reject. That ignores the connector you set up, adds a second fetch path, and stores a sensitive credential in your repository.
Finally, Lovable reads the content model and the content in the story and builds one component per block:
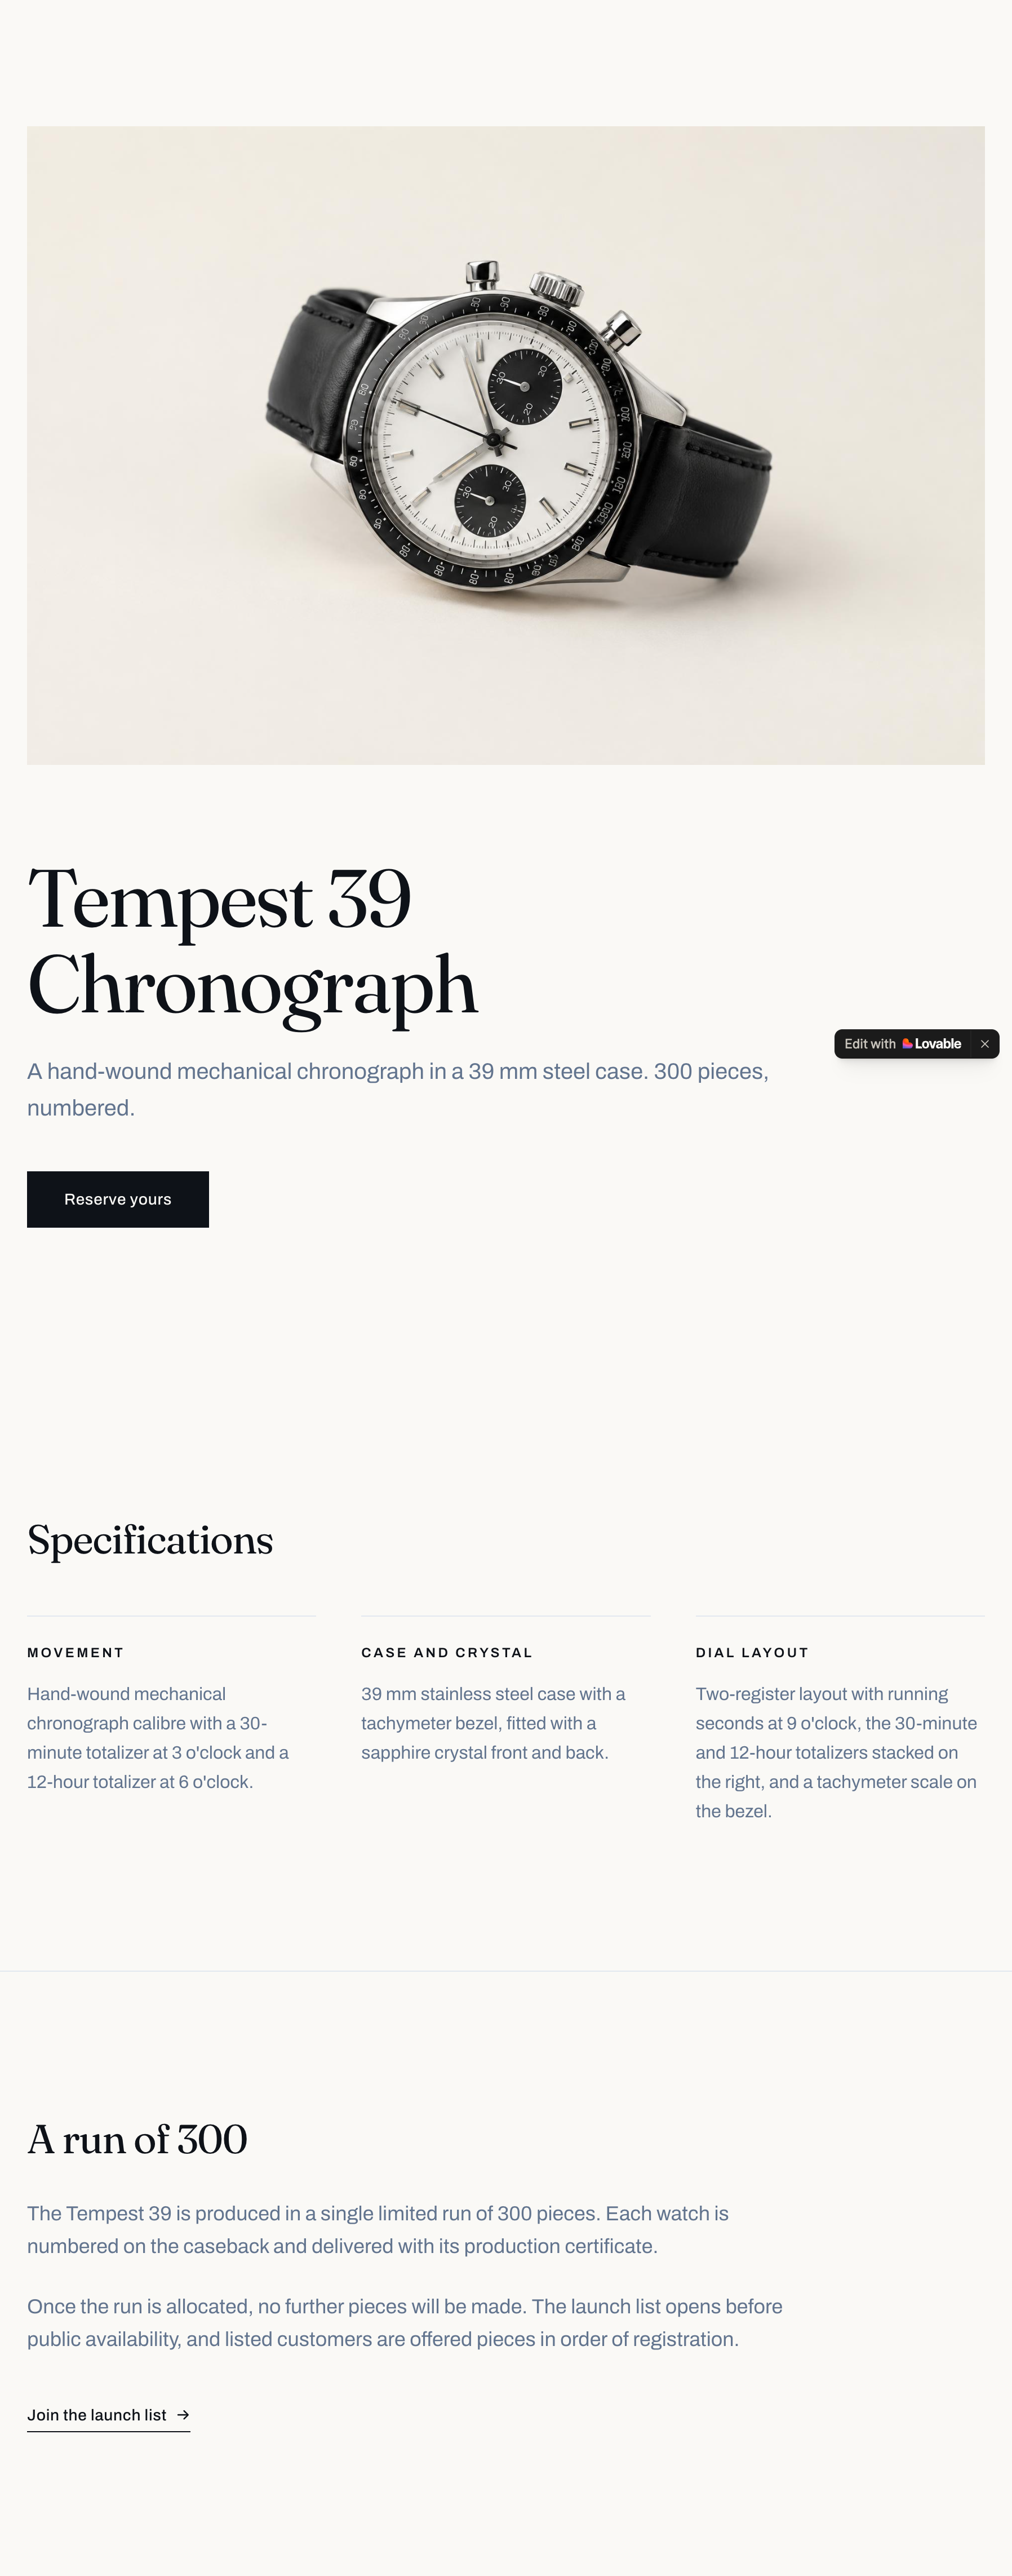
The page Lovable built: hero, spec grid, and closing section, one component per Storyblok block, every string from the story.
What happens behind the scenes
Lovable generates a server function that requests the story from its connector gateway. The gateway follows the connector security model and stores your Storyblok token where your code can’t leak it. Then, it calls the Content Delivery API and returns the content. The page fetches the published story on each request, so when an editor updates a headline in Storyblok, the change is visible on the next page load, with no rebuild.
You never write a Storyblok API call, and you never put the token in the project.
That convenience has a cost worth knowing. Your deployed app depends on Lovable’s gateway and the tokens that Lovable manages for you. If you delete the connection, the app stops rendering content. If you export the code, you replace that one server function with a direct API call that requires token handling.
Troubleshoot
If something fails, check the following:
- Lovable stays on “Adding…”. OAuth is selected. Lovable’s MCP form defaults to OAuth, which Storyblok’s MCP server doesn’t accept from Lovable yet. Select Cancel, add the server again, and choose Bearer token or API key.
- The connector returns
401 Unauthorized. The region on the connection doesn’t match the space. Recreate the connection with the right region. - A write tool returns
403 Insufficient scope. The response names the missing scope, for examplecomponents:write. Generate a new personal access token with that scope, then open the MCP server in Lovable’s Connectors and replace the bearer token. - You can’t find the blocks in your space. The agent wrote to a different space. If Lovable’s Connectors lists more than one Storyblok MCP server, the agent can’t tell them apart because both expose the same tool names. Remove every Storyblok MCP server except the one for this space, and check its tool permissions.
Takeaways
The connector gives Lovable a first-party route to Storyblok, so instead of integrating everything yourself, you fill out a form. Pair it with the MCP server, and the agent builds your content model in the chat while your live app only ever reads.
The next page reuses the same content model: blocks with typed fields, an allowlist on page.body, and copy you edit in Storyblok’s Visual Editor.
When you’re ready to create more than a couple of pages, ask Lovable to take advantage of Storyblok’s additional features, including AI translations, asset management, and user roles.
Questions or Feedback?
Join our Discord (opens in a new window)Author